TypeScript IOC 设计模式初探
什么是 IOC? IOC 的全称是 Inversion of Control ,中文名为「控制反转」 ,是一种在面向对象开发中用来降低系统耦合度的一种设计模式 。最常见的实现方式是「依赖注入」(Dependency Injection) ,也就是 DI ;还有一种实现方式叫做「依赖查询」(Dependency Lookup) 。
为什么需要控制反转 我们不妨来看这样一个例子:我们假设存在下面三个接口,Soldier 士兵、Gun 枪、Ammo 弹药。
1
2
3
4
5
6
7
8
9
10
11
export interface Ammo {}export interface Gun {fire (): void ;reload (ammos : Ammo []): Ammo [];export interface Soldier {trigger (): void ;reload (ammos : number ): void ;
我们分别对应这三个接口实现了三个类:Sniper 狙击手、Rifle 来复枪、Magnum 马格南弹。
1
2
3
4
5
6
7
8
9
10
11
12
13
14
15
16
17
18
19
20
21
22
23
24
25
26
27
28
29
30
31
32
33
34
export class Magnum implements Ammo {}export class Rifle implements Gun {private MAX_AMMO_NUMBER = 5 ;private _ammos : Magnum [] = [];fire (if (this ._ammos .length === 0 ) return console .log ('\x1B[33m%s\x1B[39m' , 'No ammo!' );this ._ammos .shift ();console .log ('biu~' );reload (ammos : Magnum []return ammos.slice (this .MAX_AMMO_NUMBER - this ._ammos .length );export class Sniper implements Soldier {private _rifle : Rifle ;private _ammos : Magnum [];constructor (this ._rifle = new Rifle ();this ._ammos = new Array (30 ).fill ().map (() => new Magnum ());trigger (this ._rifle .fire ();reload (ammos : number this ._rifle .reload (this ._ammos .splice (0 , ammos));
通过上面这个例子可以很清晰地看到 Sniper 是依赖了 Rifle 和 Magnum 类的。对我们来说这样一种依赖关系很常见,但是随着系统不断增大,各个类对应的能力也会不断地增加。在我们这个例子中,Rifle 也可能进一步增加对 Magnum 类的依赖。这套系统会随着后续的开发变得越来越累赘,各个类之间的耦合度越来越高,随着时间的流逝,最后整个项目都将会发展成沉重的历史债务。
IOC 容器 众所周知,在我们国家,军队的管理方式是人枪分离、枪弹分离。军人需要使用枪支时,需要向军械部进行申请(我没当过兵,具体是不是军械部不清楚,这边先假定是军械部),由军械部向军人发放枪支;同时,武器的弹药也是从军械部的库房中拿的。
1
2
3
4
5
6
7
8
9
10
11
12
13
14
15
16
17
18
19
20
export interface IRifle extends Gun {}export interface IAmmos {ammos : Ammo [];export interface IMagnums extends IAmmos {ammos : Magnum [];export class Sniper implements Soldier {@DRifle private _rifle!: IRifle ;@DAmmos private _ammos!: IMagnums ;trigger (): void {this ._rifle .fire ();reload (ammos : number ): void {this ._rifle .reload (this ._ammos .ammos .splice (0 , ammos));
可能有些同学看到这里会一脸懵逼,没关系,我最早看到这里的时候也是一脸懵逼,我们下面就来解释一下。@DRifle 和 @DAmmos 理解成是一个狙击手 Sniper 对这两件装备的声明,他向军械部声明自己需要这两件装备,但自己并不持有。我们可以把 @DRifle 理解成士兵的持枪证,当狙击手扣动扳机 trigger 的时候会使用到 rifle ,他便凭借 DRifle 向军械部索取一把步枪。
TypeScript 装饰器 感谢 TypeScript 内置了装饰器能力,使得我们运用 IOC 设计模式进行编程成为了可能。不过在使用装饰器之前,我们需要先在项目的 tsconfig.json 当中添加一项配置:
1 2 3 4 5 {"compilerOptions" : {"experimentalDecorators" : true ,
添加这一条配置能够使得编译出来的 js 代码具有类型声明,这是 TypeScript 通过 Reflect Metadata 实现的。 Reflect Metadata 是 ES7 的一项提案,它主要用来在声明的时候添加和读取元数据。我们这里不再过多赘述,有兴趣的读者可以自行查阅资料进行学习。
1
2
3
4
5
6
7
8
9
10
11
12
13
14
export interface Identifier <T> {args : any []): void ;type : T;export function createGunDecorator<T>(gunId : string ): Identifier <T> {const identifier = <Identifier <T>>function (target : object , key : string any >target)[key] = {}; toString = () => gunId;return identifier;export interface IRifle extends Gun {}const DRifle = createGunDecorator<IRifle >('rifle_01' );
在上面的代码块中,我们实现了一个识别接口 Identifier ;一个用来生产枪支描述符(持枪证)的函数 createGunDecorator ,它通过传入一个枪支 ID 来给发放的持枪证做上标记,通过函数的泛型传入对应的枪支类型。在下方我们也使用该函数创建出了一枚名叫 rifle_01 的步枪持枪证,下面我们回到 Sniper 类当中,看看我们的狙击手是怎么使用这枚持枪证的。
1
2
3
4
5
6
7
8
9
10
11
const DRifle = function (target : object , key : string any >target)[key] = {};DRifle .toString = () => 'rifle_01' ;export class Sniper implements Soldier {@DRifle private _rifle!: IRifle ;
我们这枚持枪证是如何在狙击手的手中发挥出它的作用的呢?我们来具体看一下 DRifle 的实现。DRifle 函数接受了两个参数,分别是 object 类型的 target 以及 string 类型的 key 。在 Sniper 中我们以 @DRifle private _rifle!: IRifle; 的方式使用了这个函数,实际 DRifle 接受的参数分别是实例化时的 Sniper 对象以及字符串形式的 '_rifle' 。所以 DRifle 函数 真正的作用是在 Sniper 实例化时为实例化后的狙击手对象挂载上了一个键值为 '_rifle' 的空对象。
1
2
3
4
5
6
7
8
9
10
11
12
13
14
15
16
17
18
19
20
21
22
23
24
25
26
27
28
29
30
31
32
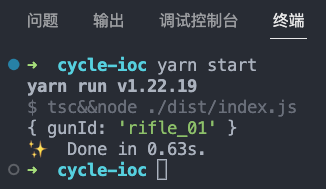
interface Identifier <T> {args : any []): void ;type : T;function createGunDecorator<T>(gunId : string ): Identifier <T> {const identifier = <Identifier <T>>function (target : object , key : string any >target)[key] = {toString = () => gunId;return identifier;interface IRifle extends Gun {}const DRifle = createGunDecorator<IRifle >('rifle_01' );class Sniper implements Soldier {@DRifle public _rifle!: Gun ;@DAmmos private _ammos!: IMagnums ;trigger (): void {this ._rifle .fire ();reload (ammos : number ): void {this ._rifle .reload (this ._ammos .ammos .splice (0 , ammos));const sniper = new Sniper ();console .log (sniper._rifle );
执行结果:
实现 IOC 容器 现在是不是要对军械部进行实现了?诶,先别急,军械部的武器也是从兵工厂 生产出来的啊,没有兵工厂,军械库上哪获得武器呢?
1
2
3
4
5
6
7
8
9
10
11
12
13
14
15
16
17
18
19
20
21
22
23
24
25
26
27
28
export class Factory {private _entries = new Map <Identifier <any >, any >();constructor (...entries : [Identifier <any >, any ][] ) {for (const [id, service] of entries) {this .set (id, service);id : Identifier <T>,instance : Tconst result = this ._entries .get (id);this ._entries .set (id, instance);return result;has (id : Identifier <any >): boolean {return this ._entries .has (id);id : Identifier <T>): T {return this ._entries .get (id);export const factory = new Factory ();
整个兵工厂的函数非常简单,就是很单纯的存取的功能。与其说是兵工厂,倒不如说它更像是军火库。
1
2
3
4
5
6
7
8
9
10
11
12
13
14
15
16
17
18
19
20
21
22
23
24
25
26
27
28
29
30
31
32
33
34
35
export interface IArsenal {id : Identifier <T>): T;wareHouse : Map <Identifier <any >, any >;export const arsenal : IArsenal = {id : Identifier <T>) {return (this .wareHouse .get (id) ||() => {let serviceInstance = undefined as undefined | T;const service = new Proxy (get (_, property : string ) {if (!serviceInstance) {get (id);const target = (serviceInstance as any )[property];return typeof target === 'function' (...args : any [] ) => {return target.call (serviceInstance, ...args);this .wareHouse .set (id, service);return service as T;wareHouse : new Map <Identifier <any >, any >(),
接下来,我们结合创建一把步枪到士兵开火的过程,来解释一下上面这两段代码在整个流程中占据的生态位:
1 factory.set (DRifle , new Rifle ());
我们这边直接创建一把步枪,将一份持枪证的副本和枪支一起塞进兵工厂,让持枪证对应一把步枪。当狙击手去调用 _rifle 时,会通过持枪证的逻辑去尝试领取枪支,但是目前我们的持枪证只是给狙击手塞了一张空头支票,下面我们对持枪证的代码进行修改,让它能够拿到真正的枪支:
1
2
3
4
5
6
7
export function createGunDecorator<T>(gunId : string ): Identifier <T> {const identifier = <Identifier <T>>function (target : object , key : string any >target)[key] = arsenal.get (identifier);toString = () => gunId;return identifier;
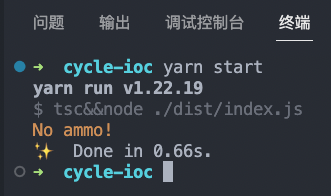
这样一来,持枪证的逻辑就变成实例化士兵时,我们直接从军械部调取持枪证对应的步枪交给士兵。现在的士兵已经可以开枪射击了:
1
2
const sniper = new Sniper ();trigger ();
现在,这一套流程就非常清楚了:
生产出枪支后,为枪支指定一本持枪证,加入到军械部的库房中;
当士兵入伍(实例化)时,通过自己持有的持枪证,向军械部申请一把步枪;
军械部考虑到安全问题,并没有直接将枪支交给士兵,而是变相地给了士兵一个使用该枪支的权限(Proxy);
可怜的新兵并不知道自己被军械部糊弄了,以为自己手上真的拿到了一把步枪,乐乐呵呵地跑去靶场准备开枪;
实际上,只有在新兵对枪支进行操作时,军械部才会火急火燎地从库房中找出士兵的持枪权限对应的那把步枪,并代理为新兵执行操作(对,没错,真正扣扳机的是军械部,只是它让新兵感知不到是别人在帮他开枪)。
懂了,所以新兵其实是 替身使者
大家这里可以思考一个问题: 真正意义上的 IOC 连创建对象的过程也交给了 IOC 容器,但在我们上面的实例代码中,我们是人为显式地通过 factory.set(DRifle, new Rifle()); 实例化了一把步枪。https://github.com/ch1ny/react-electron-typescript-template/tree/master/src/main/core
你并不需要使用 IOC 上文只是对 TypeScript 实现 IOC 设计模式做了一个简单的介绍,只是为读者引入了这样的一个概念,所以上面的实例代码还比较粗糙。
生成一个对象的步骤变复杂了,原本由我们手动创建的对象现在交给了 IOC 容器进行实例化。对于不习惯这种方式的人,会觉得有些别扭和不直观。
对象生成因为是使用反射编程,在效率上有些损耗。但相对于IoC提高的维护性和灵活性来说,这点损耗是微不足道的,除非某对象的生成对效率要求特别高。


